The Heat Lamp That Keeps Baby Chicks Alive: A Complete Guide to Brooding with the Satco 250-Watt Red Bulb
How the Satco 250-watt red heat lamp bulb delivers the infrared warmth baby chicks need to survive their first weeks — and how to set up your brooder safely so the lamp doesn't become a fire hazard
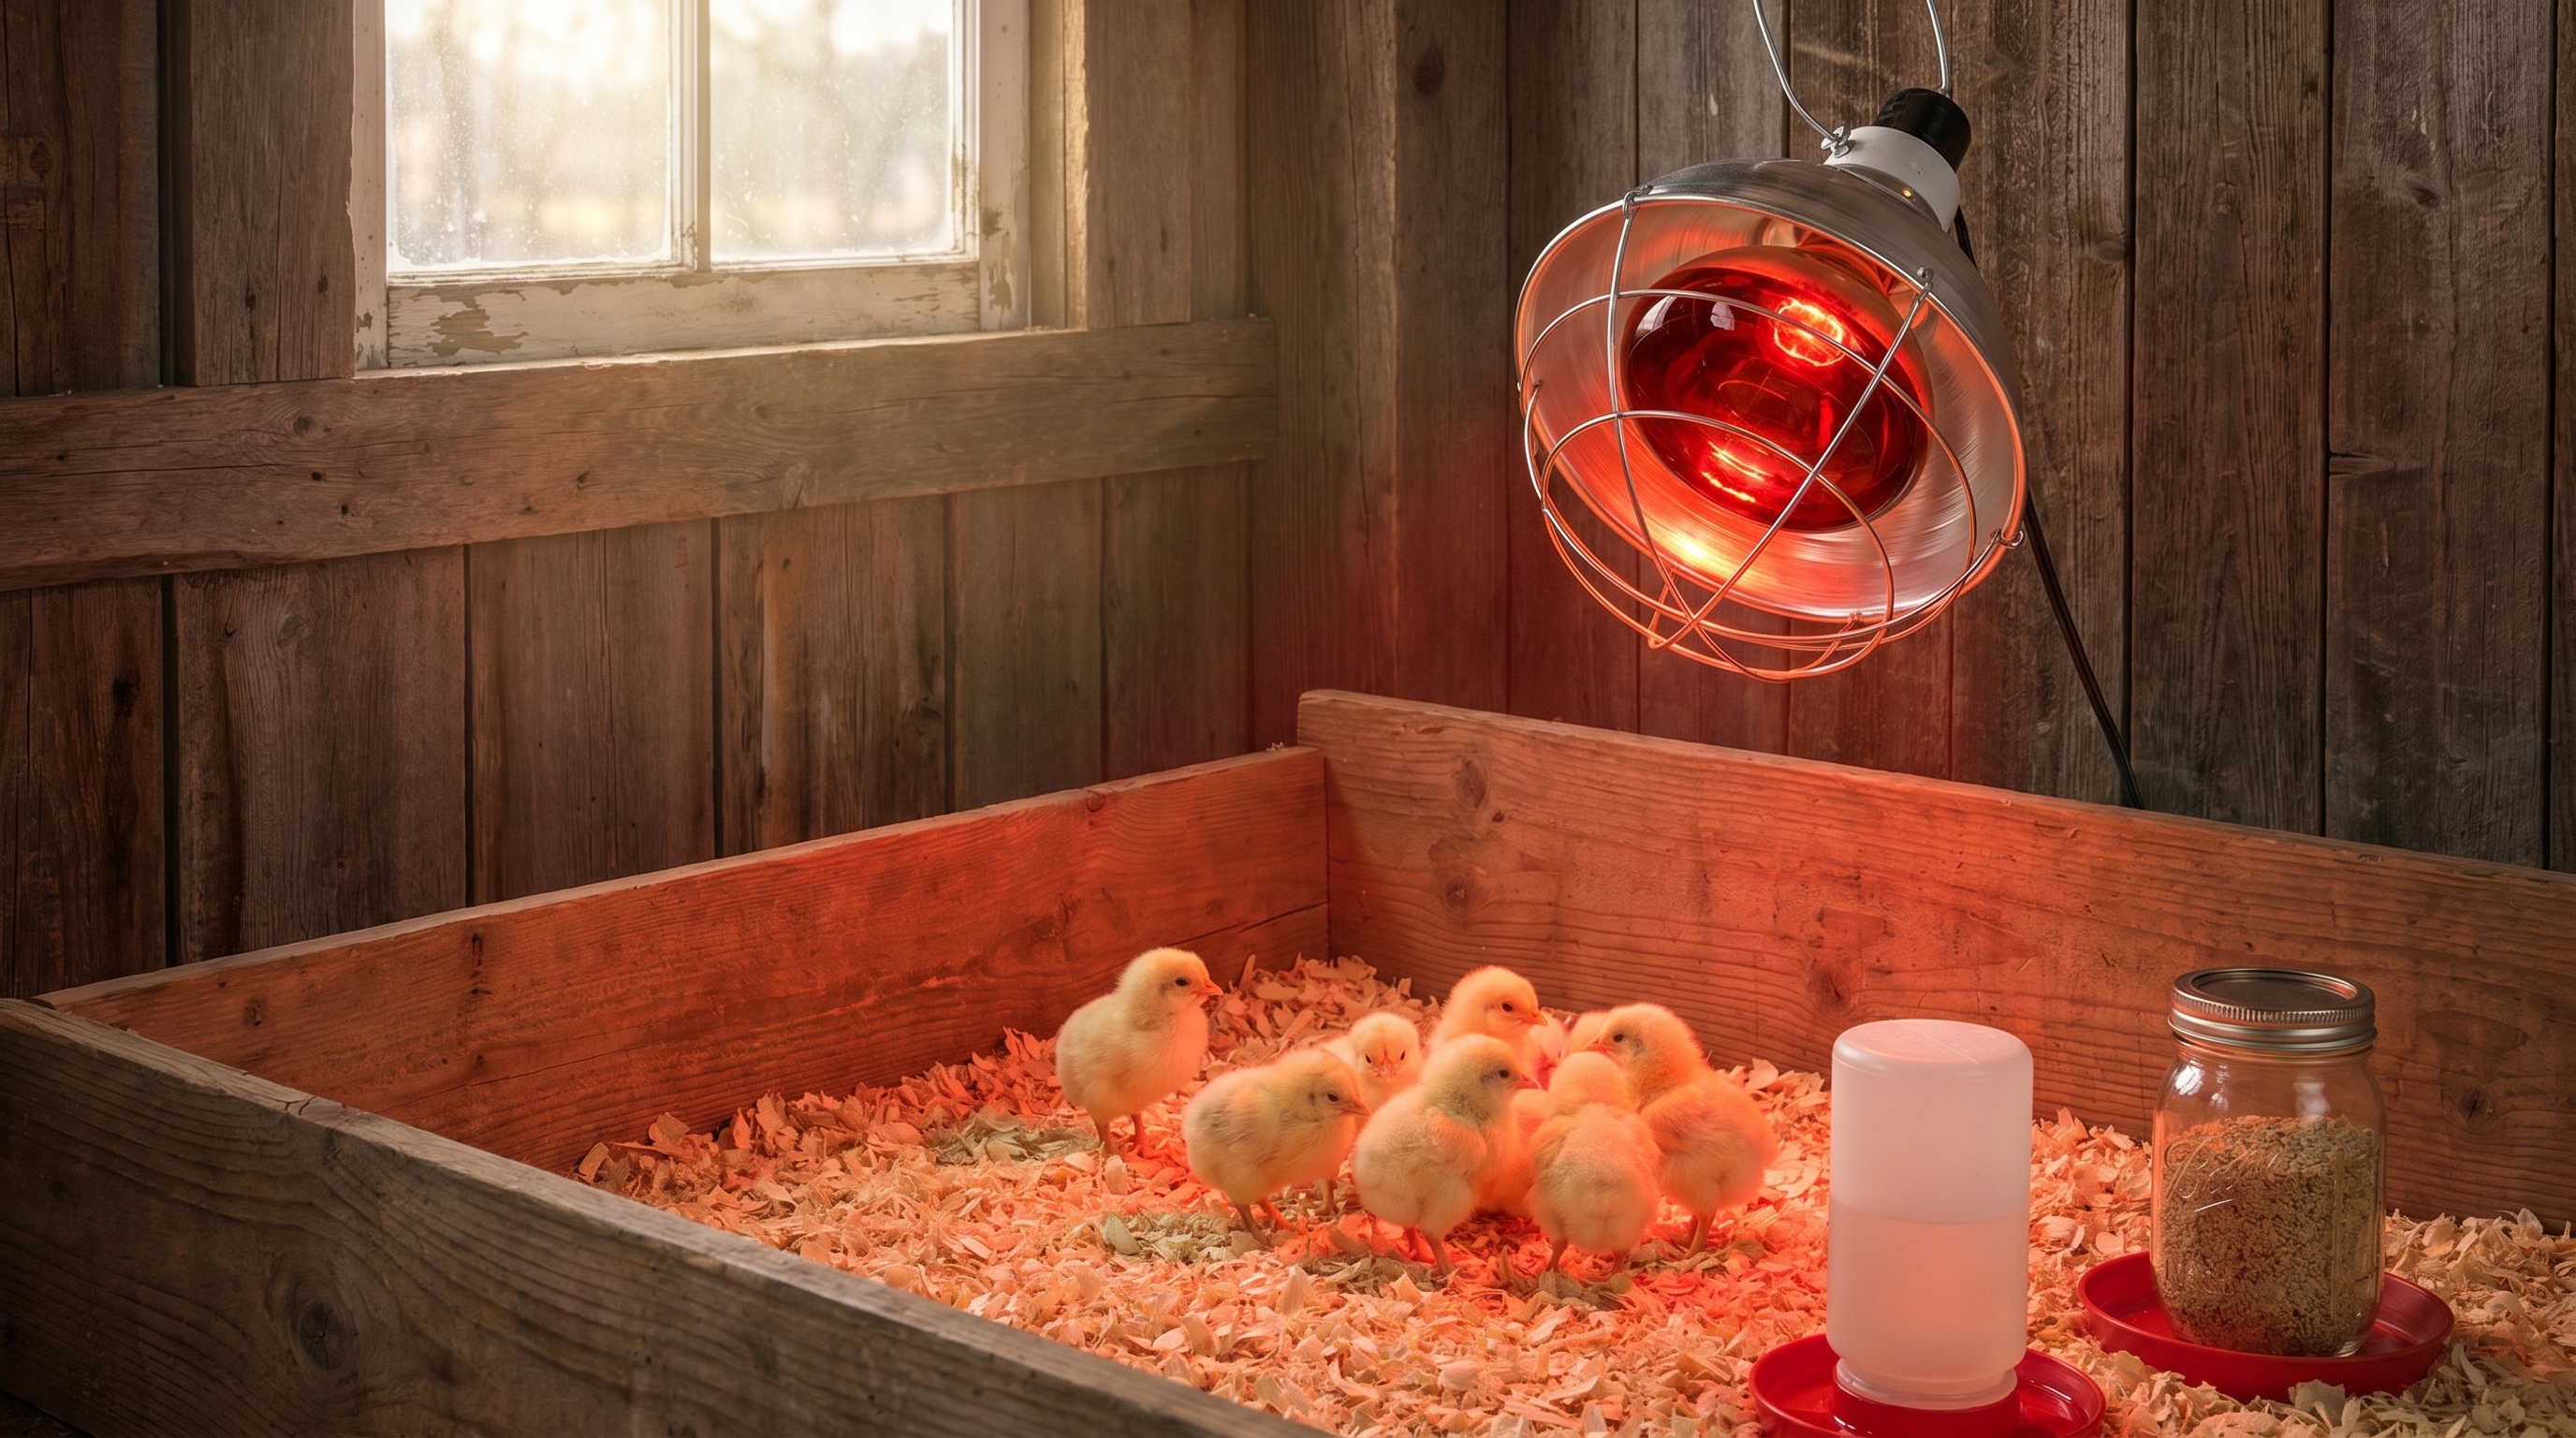
Baby chicks cannot regulate their own body temperature for the first four to six weeks of life. In the wild, they'd spend those weeks tucked under a broody hen who provides steady warmth on demand — but in a backyard or farm brooder, that job falls to you and a reliable heat source. The Satco Red Heat Lamp Bulb (250-watt), available at Liberty Farm, Home & Garden in Galion, Ohio, is one of the most dependable tools for that job: a purpose-built infrared bulb that delivers consistent radiant heat at the output level brooding chicks genuinely need, in red light that's measurably less disruptive to young birds' sleep and behavior than white incandescent heat lamps. Getting the heat lamp right isn't just a comfort issue — it's a survival issue. Too cold and chicks pile on top of each other, smother the ones on the bottom, develop pasty butt, and die from hypothermia. Too hot and they disperse to the edges, pant, and die from heat stress. The right bulb in the right fixture at the right height, secured safely, is the foundation every successful brooder is built on.
Why Baby Chicks Need Supplemental Heat — and Exactly How Much
Newly hatched chicks are homeothermic — they're designed to be warm-blooded animals that maintain a consistent internal body temperature. The problem is that the physiological systems that make that possible (feather insulation, shivering thermogenesis, brown fat mobilization) aren't fully developed at hatch. Down feathers are excellent insulation for a chick pressed against siblings or tucked under a mother hen, but they're insufficient against ambient temperatures below approximately 90°F in the first week of life. The chick's metabolic rate is also too low at hatch to generate enough body heat through shivering to compensate for cold ambient conditions.
The result is that newly hatched chicks require an ambient temperature in the 90–95°F range at brooder floor level during their first week. That's warmer than most residential spaces, warmer than a barn in late spring, and warmer than you'd keep anything else in a coop environment. The heat requirement decreases predictably as chicks develop: roughly 5°F per week until they're fully feathered and temperature-independent at six to eight weeks of age.
A 250-watt infrared bulb provides enough heat output to warm a conventional brooder box — a stock tank, a Rubbermaid tote, a purpose-built wooden brooder, or a sectioned-off corner of a coop — to the temperatures chicks need in normal residential and barn environments. In very cold environments (an unheated barn in Ohio in March or April), a single 250-watt bulb may be insufficient and two lamps or a smaller, well-insulated brooder space may be necessary. In warm summer conditions — Ohio in June or July when ambient temperatures are already in the 80s — the same lamp on the same height may produce too much heat and need to be raised or replaced with a lower-wattage option. Read the chicks, not just the thermometer: well-heated chicks are evenly distributed under the lamp, active, and vocalizing quietly. Cold chicks pile together directly under the heat source and cheep loudly. Hot chicks move to the edges of the brooder, away from the lamp, and may pant.
Why Red Light Matters for Baby Chicks
Heat lamps for poultry are available in two light colors: white (clear) and red. The Satco 250-watt bulb is red, and that's not an aesthetic choice — it has measurable effects on chick behavior and welfare that make red the right choice for brooding applications.
Sleep disruption. Chicks follow natural light cycles and require periods of relative darkness to sleep normally. A white incandescent heat lamp running continuously provides bright white light 24 hours a day, suppressing the production of melatonin and disrupting the sleep-wake cycle that young birds need for healthy development. Red light is perceived as closer to darkness by avian visual systems — the red wavelengths are significantly less stimulating than white or blue-white light, allowing chicks to sleep normally even while the lamp runs for heat.
Pecking behavior. Feather pecking and cannibalism are common and serious problems in young poultry. White light makes wounds and blood highly visible to other birds, which triggers and escalates pecking behavior. Red light significantly reduces the visibility of blood and wounds, which is one of the primary reasons commercial poultry operations adopted red lighting for high-density brooding decades before it became standard practice in backyard settings. In a small backyard brooder with 6–25 chicks, the cannibalism risk is lower than in commercial density settings, but red light remains the safer and more welfare-appropriate choice.
Stress reduction. Brooder chicks under continuous white light exhibit higher rates of fearfulness and stress behaviors than chicks under red or dim light. The stress difference isn't dramatic in well-managed small brooder situations, but removing unnecessary stressors from the first weeks of a chick's life contributes to better long-term outcomes: calmer adult birds, better immunity from reduced cortisol load, and more even development across the flock.
Setting Up Your Brooder: The Basics Before You Switch On the Lamp
The heat lamp is the center of the brooder setup, but it functions within a system. Getting the surrounding elements right makes the lamp effective; getting them wrong creates problems the lamp alone can't solve.
Brooder container. The brooder needs to be large enough for chicks to move freely — both toward and away from the heat source — and small enough to retain heat efficiently. For a small flock of 6–12 chicks, a 50-gallon stock tank or a large Rubbermaid tote provides adequate space. For 25+ chicks, a sectioned-off corner of a barn or coop is more practical. The brooder walls need to be at least 18 inches high to prevent jumping chicks from escaping before they have full feathering, and to prevent drafts at floor level from chilling the flock.
Bedding. Use pine shavings (medium or coarse) as the brooder floor. They're absorbent, dry fast after water spills from a waterer, and comfortable for chick feet. Do not use cedar shavings — the aromatic oils are irritating to young respiratory systems. Do not use newspaper — it's slippery and causes a condition called splay leg (spraddle leg) in young chicks whose legs haven't fully coordinated. Do not use fine sawdust — it gets into nostrils and eyes. Start with 3–4 inches of pine shavings and add or replace as needed to keep the floor dry.
Temperature measurement. Place a thermometer on the brooder floor, at the edge of the lamp's direct heat zone, before you put chicks in. Verify the temperature before adding chicks — it takes 30–60 minutes for the brooder to fully equilibrate after the lamp is turned on. Adjust lamp height (higher = cooler at floor level; lower = warmer) to hit your target temperature for the chicks' age.
Feed and water from day one. Chicks need access to chick starter feed and fresh water within hours of placement. Water is more immediately critical than feed — chicks can go 12–24 hours without eating but become rapidly dehydrated, especially under the drying heat of a lamp. Position the waterer and feeder outside the direct heat zone of the lamp so chicks aren't forced to eat and drink while overheated, but within easy reach of the entire brooder floor.
How to Mount and Secure a Heat Lamp Fixture Safely
The lamp fixture matters as much as the bulb. The Satco 250-watt bulb is the heat source; the fixture determines whether that heat source is safe or dangerous. These are the components and practices that separate a safe heat lamp setup from a fire risk:
Use a fixture with a built-in wire guard. The guard that encloses the front of the lamp fixture serves two functions: it prevents the bulb from coming into direct contact with bedding if the fixture is bumped or falls, and it provides a secondary attachment point for a safety chain. Fixtures without guards are not appropriate for use in a livestock or poultry environment regardless of how carefully they're otherwise mounted.
Install a secondary suspension system. A chain, wire rope, or heavy-duty strap attached to the lamp fixture's guard or body — not to the cord — provides a suspension backup that holds the fixture in place if the cord attachment fails. The chain or wire should be attached to a structural element overhead (a rafter, a ceiling joist, a crossbeam) using a secure hook or clamp. The fixture should be held by both the cord attachment and the chain; the chain is the backup, not the primary mount, but it is what prevents the fixture from falling to floor level if the cord fails.
Keep the cord clear of the heat zone. Power cords running near or against the hot metal of the fixture housing will degrade faster than cords kept away from the heat. Arrange cord routing so the cord does not contact the fixture body and is not pinched or kinked against a structural element. Inspect cords at the start of every brooding season for cracking, fraying, or heat discoloration and replace any cord that shows wear.
Allow adequate airspace around the bulb. The Satco 250-watt bulb generates significant heat at the bulb surface. The fixture housing must provide clearance around the bulb — do not use fixtures where the bulb contacts or nearly contacts the housing sides. The glass envelope needs air circulation to dissipate surface heat; restricted airspace around the bulb degrades bulb life and increases housing temperature.
Position for safe chick access. Mount the fixture at a height that delivers the target temperature at floor level while keeping the bulb itself at least 18 inches above the top of the brooder bedding — far enough that a chick cannot contact the hot bulb or guard. For a 250-watt bulb in a typical 18-inch-deep stock tank brooder, starting height around 18–24 inches above the floor is a reasonable starting point; adjust based on measured floor temperature.
Temperature Guide: How to Adjust Heat Week by Week
The brooding temperature target changes week by week as chicks develop feathering and thermoregulatory capacity. The standard recommendation is to start at 90–95°F at brooder floor level during week one and reduce by 5°F per week until the brooder matches ambient barn or outdoor temperature, at which point the lamp can be discontinued. In practice, chick behavior is a more reliable guide than the thermometer alone — use the thermometer to set your starting point and use chick behavior to fine-tune.
| Chick Age | Target Floor Temp | What Correct Temp Looks Like |
|---|---|---|
| Week 1 (Days 1–7) | 90–95°F | Chicks distributed evenly under lamp, actively eating and drinking, quiet or soft chirping |
| Week 2 (Days 8–14) | 85–90°F | Chicks active throughout brooder, not piled under lamp, not crowded at edges |
| Week 3 (Days 15–21) | 80–85°F | Chicks move freely, pin feathers starting, less time directly under lamp |
| Week 4 (Days 22–28) | 75–80°F | Feathering progressing, chicks use lamp area as one zone among many in brooder |
| Week 5 (Days 29–35) | 70–75°F | Most breeds have adequate feathering, lamp optional in warm conditions |
| Week 6+ (Day 36+) | Ambient (60°F+) | Fully feathered; lamp discontinued if ambient temperature exceeds 60°F |
To reduce temperature week by week, raise the lamp fixture rather than swapping bulbs. Raising the lamp 2–3 inches typically reduces floor temperature by 5–8°F depending on brooder dimensions and ambient conditions. If your brooder is small, a 250-watt bulb at maximum safe height may still produce more heat than the chicks need in weeks 4–6 — in that case, a lower-wattage bulb (125W or 175W) for the final weeks is appropriate. The Satco 250-watt is sized for the early brooding weeks when heat demand is highest.
What Else Your Brooder Needs: Feeders and Waterers
The heat lamp is the foundation, but a functional brooder requires the right feeders and waterers sized for young chicks. Liberty Farm, Home & Garden carries several options that pair directly with the Satco heat lamp for a complete brooder setup:
- Little Giant Screw-On Poultry Jar (1 qt) — A quart-sized jar that screws onto the Little Giant base systems for both feeding and watering. The small opening keeps chicks from getting into the feed or water and getting soaked, which is a particular concern with heat lamp brooders where wet chicks can quickly become hypothermic chicks. Rotate clean jars daily to keep fresh water available at all times.
- Little Giant Plastic Feeder Base (1 qt) — The base that pairs with the screw-on jar for feeding. The raised slots allow chicks to access feed at beak level without scratching it onto the floor, reducing waste and keeping the feed cleaner. For very young chicks (days 1–3), scatter a small amount of starter feed directly on paper towels laid over the shavings to help them find feed before they learn to use the jar feeder.
- Little Giant Screw-On Poultry Waterer Base (1 qt) — The water-specific base for the quart jar. The waterer channels water to the outer trough at a controlled rate, preventing the flooding that often happens when chicks tip over open dishes. Keep the waterer filled and change water at least once daily — chicks foul water quickly with shavings and droppings, and dirty water suppresses the immune function that young birds need during the stress of brooding.
- Lixit Chicken Feeder or Waterer with Reversible Base — A versatile dual-purpose option with a reversible base that configures as either a feeder or a waterer. Well-suited for larger brooders or as chicks grow and graduate from the small quart jars to larger-capacity vessels. The Lixit base is deeper and holds more volume, reducing the number of refills needed daily during the high-consumption weeks when chicks are actively growing.
Position feeders and waterers at the edge of the lamp's heat zone — close enough for chicks to access easily from both the heated area and the cooler edges, but not directly under the lamp where heat accelerates bacterial growth in the water and dries out the feed. As chicks grow, raise the feeder height to beak level to reduce the amount of feed they scratch out onto the floor.
Other Uses for the Satco 250-Watt Red Heat Lamp
The Satco 250-watt bulb is designed primarily for brooding, but infrared heat lamps serve several other purposes in a barn and livestock operation:
Warming newborn livestock. Lambs, kids (baby goats), and piglets born in cold conditions benefit from a heat lamp during the critical hours after birth when they're still wet and have not yet nursed and built blood sugar. A 250-watt bulb suspended safely above a deep-bedded pen can provide the warming environment that allows a slow-starter to recover enough strength to stand and nurse. Monitor closely — the goal is warming, not overheating, and a vigorous newborn that's dried off and nursing does not need supplemental heat in normal spring conditions.
Supplemental barn heat in cold snaps. During unexpectedly cold periods — Ohio's late-spring cold snaps are a recurring reality — a heat lamp in a well-bedded section of the barn provides localized warmth for animals that would otherwise be stressed by rapid temperature drops. This is supplemental, not primary, heat — it warms a small zone within the barn rather than heating the barn itself.
Keeping water from freezing. A heat lamp positioned above a waterer in very cold conditions can extend the amount of time water stays liquid — though a purpose-built heated waterer (like the Farm Innovators heated poultry fountain) is more reliable and energy-efficient for that specific use in the depths of an Ohio winter.
Heat therapy for injured poultry. A bird that's been attacked by a predator, suffered frostbite, or is in shock from injury benefits from a quiet, warm recovery space. A hospital cage or box with a heat lamp keeping the ambient temperature at 85–90°F supports recovery by allowing the bird to focus metabolic resources on healing rather than thermoregulation.
| Specification | Details |
|---|---|
| Product Name | Satco Red Heat Lamp Bulb |
| Wattage | 250 watts |
| Light Color | Red (infrared spectrum) |
| Heat Type | Infrared radiant heat |
| Primary Use | Brooding chicks, warming newborn livestock, supplemental barn heat |
| Red Light Benefit | Less disruptive to chick sleep cycles than white light |
| Fixture Requirement | Heavy-duty fixture with wire guard; fixture sold separately |
| Safety Requirement | Chain or secondary suspension required — never secure by cord alone |
| Brand | Satco |
| Available At | Liberty Farm, Home & Garden, Galion, Ohio |
Frequently Asked Questions
Keep Reading
Why Your Backyard Chickens Need Grit and Probiotics This Summer
Learn why summer is the most important time to offer poultry grit with probiotics to your backyard chickens in Ohio. Find Manna Pro Poultry Grit with Probiotics at Liberty Farm, Home & Garden in Galion, Ohio.
The High-Calcium Treat Your Flock Needs Most in Summer: A Complete Guide to Black Soldier Fly Larvae
Discover why ZenithWorks Black Soldier Fly Larvae are the perfect summer treat for backyard chickens and poultry in Galion, Ohio — available now at Liberty Farm, Home & Garden.