
Stop Mice Before Fall: A Practical Ohio Home and Outbuilding Guide
Inspect, seal, store, trap, and clean safely with a practical early-fall mouse-prevention plan for Galion and north-central Ohio.
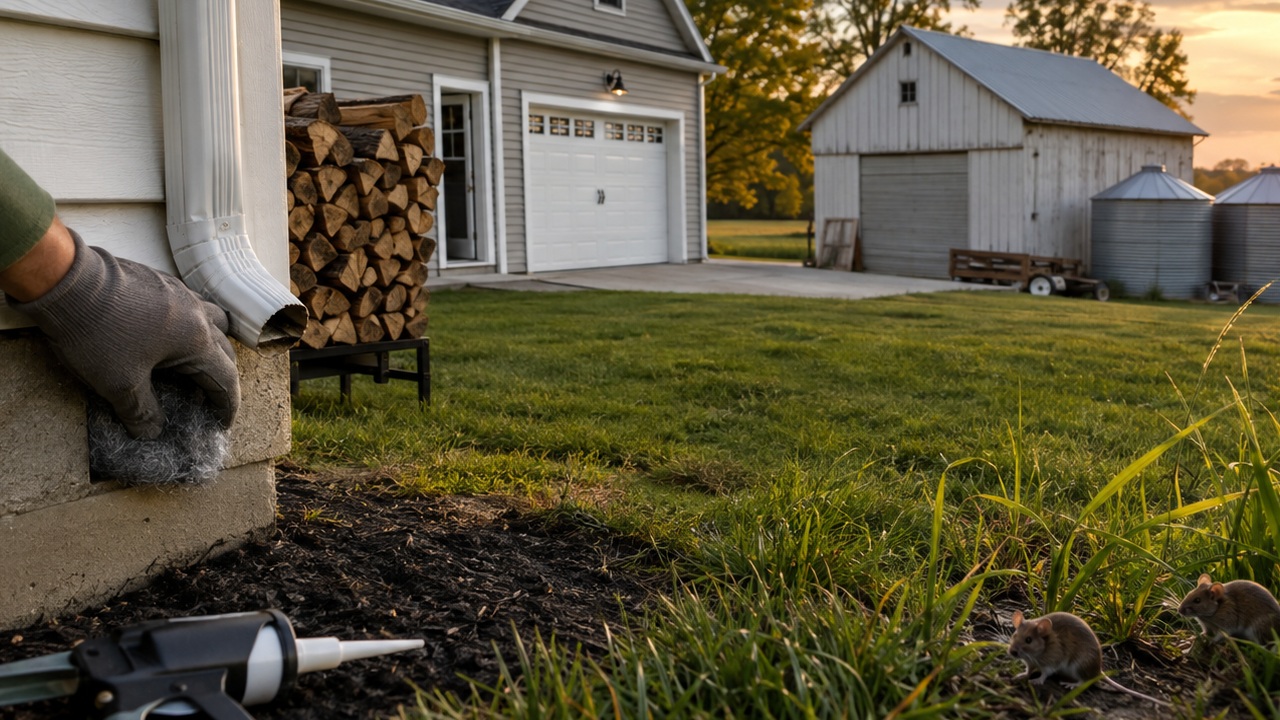
Before the first cold snap sends you looking for weatherstripping, walk the outside of your home, garage, or feed shed with a flashlight and a quarter-inch gap in mind. Early September in Galion is a practical window for mouse prevention: doors and foundations are easy to inspect, stored seed and feed can be reorganized, and repairs can be made before winter weather complicates the work.
This guide uses current EPA, CDC, and National Pesticide Information Center guidance to build a sensible sequence: confirm the signs, close entry points, remove food and shelter, trap only where activity supports it, and clean contaminated areas without raising dust. It is not about covering a property with poison. It is about making each building easier to inspect and harder for mice to use.
Why Early September Is the Right Time to Get Ahead of Mice
A quiet evening in north-central Ohio can make this job easy to postpone. The garage door still opens without a blast of cold air, the feed shed is dry, and the first hard freeze feels far away. That is exactly why early September is a useful time to inspect. You can work around foundations, doors, vents, and stored materials before cold weather turns every repair into a rushed chore.
The goal is not to make a building look sealed. It is to interrupt the three things that let a mouse problem grow: entry, food, and shelter. Closing a hole without cleaning spilled seed leaves an attraction outside the wall. Moving feed into better containers without repairing a worn door sweep leaves the route open. Setting a trap without finding the entry point may remove one mouse while the building remains available to the next one.
This is also a good moment to check spaces that have been relatively undisturbed through summer: the back of a garage cabinet, the corner behind stacked bags, the shelf where birdseed is stored, the seldom-used mower bay, and the wall behind a freezer. The Centers for Disease Control and Prevention notes that droppings and gnaw marks often appear before anyone sees a rodent, and that control is easier before rodents become established.
Think of the work as a short property audit rather than a battle with an invisible pest. Start outside in daylight. Follow the building edge. Mark suspect gaps. Then go inside and look for matching signs. You are building a map: where a mouse could enter, what it could eat, where it could hide, and where you could safely monitor activity.
For homes, garages, barns, and sheds around Galion, that practical sequence matters more than any single gadget. A durable repair plus cleaner storage and targeted monitoring is usually a better foundation than scattering products and hoping one lands in the right place.
Confirm What You Are Seeing Before You Act
You do not need to see a mouse to justify a closer inspection, but you should avoid treating every small hole or rustle as proof. Start with evidence. The U.S. Environmental Protection Agency lists droppings around food packages, shredded nesting material, gnawed packaging, chewed openings, and stale odors from hidden areas among the common signs of an infestation.
Inside, use a flashlight and work methodically. Check along walls rather than only in the middle of a room. Look behind appliances, beneath sinks, around floor drains, inside lower cabinets, along sill plates, and where pipes or wires pass through a wall. In an outbuilding, inspect shelf corners, stored fabric, cardboard, livestock or pet-feed areas, and the protected space beneath equipment. In a vehicle or mower that has sat unused, look before starting it; nesting material near wiring or air intakes needs careful handling.
Fresh evidence is more useful than an old mystery. If you find droppings, do not sweep them away dry. Follow the safe cleanup steps later in this guide, then note the location and date. Recheck the clean area. The CDC explains that droppings that reappear after safe cleaning are a stronger sign of current activity than old droppings viewed once.
Also consider which animal could be responsible. A gap, burrow, or damaged bag does not identify a species by itself. The National Pesticide Information Center recommends identifying the rodent because different species climb, dig, and travel differently. If the evidence points to a larger animal, extensive burrowing, or wildlife rather than house mice, the repair and control plan may need to change.
- Mark locations: Use painter's tape or a simple sketch so you can connect interior signs with exterior openings.
- Photograph damage: A photo helps you compare gnawing, nesting, or droppings after cleanup.
- Check food first: Damaged bags and spilled grain often reveal the busiest route.
- Note electrical damage: If wiring or equipment appears chewed, stop using it and call a qualified professional.
A good inspection reduces guesswork. It also prevents you from sealing the wrong place, placing traps where nothing travels, or overlooking a damaged wire while focusing only on the pest.
Walk the Exterior One Zone at a Time
Begin at one corner and move around the building without skipping stretches. Look low, then eye level, then up. Mice do not need a dramatic hole. NPIC advises sealing cracks and crevices larger than one-quarter inch, so a narrow opening at a utility line or door edge deserves attention even when it does not look like a doorway.
Pay special attention where materials meet: siding and foundation, masonry and wood framing, trim and roofing, or a pipe and the wall around it. Check garage-door corners, service doors, crawl-space vents, basement windows, cable penetrations, hose connections, dryer vents, roof returns, and gaps beneath deteriorated siding. Daylight visible from inside can reveal a route, but the absence of daylight does not prove a joint is tight.
| Inspection zone | What to look for | Practical response |
|---|---|---|
| Foundation and sill | Cracks, open block cores, gaps where framing meets masonry | Mark the opening, confirm it is not intended drainage, then use a durable repair suited to masonry |
| Doors and garage doors | Light at corners, torn sweeps, warped jambs, tracks that do not close evenly | Adjust the door and replace the failed seal rather than filling a moving joint |
| Pipes, wires, and conduits | Oversized penetrations or loose escutcheons | Use compatible materials; keep clearances required for heat, electricity, and service access |
| Vents and louvers | Torn screening, missing covers, open edges | Repair with an approved guard that preserves airflow and equipment function |
| Roofline and trim | Loose soffit, fascia gaps, branches touching the structure | Repair trim and reduce travel paths without blocking ventilation |
| Storage beside walls | Firewood, cardboard, dense vegetation, spilled feed | Create inspection space, remove clutter, and clean food residue |
Do not seal a functioning vent, weep opening, drain, combustion-air opening, or equipment exhaust. If you cannot tell whether an opening is intentional, identify its purpose before changing it. The same caution applies around electrical service, gas lines, furnaces, and dryers. Exclusion work should never create a fire, moisture, ventilation, or carbon-monoxide hazard.
After the walk, prioritize openings that connect with interior evidence, gaps around food storage, and doors that fail every time they close. A checklist keeps the work finite: repair, photograph, date, and recheck after the next weather change.
Make Repairs That Last Without Damaging the Building
A repair should match the surface and the way the joint moves. A hole in concrete block is not the same job as a gap beneath a service door. A utility penetration may need to remain accessible. A vent must continue to move air. Before buying material, decide whether you are patching a rigid opening, closing a moving edge, protecting ventilation, or filling the space around a pipe.
The EPA notes that a small hole may be plugged with steel wool and that holes in walls should be patched. Treat that as the beginning of the repair, not permission to stuff loose material into every opening. A permanent exterior fix often needs a gnaw-resistant component—such as metal mesh, flashing, or a proper patch—secured to sound material and finished against weather. Sealant can close the remaining joint when it is rated for the surfaces and conditions. Expanding foam by itself is not a substitute for a durable, gnaw-resistant repair in an exposed opening.
Match the fix to the failure
- Rigid cracks and voids: Remove loose material and use a compatible masonry or patching system. Large or structural cracks need professional evaluation.
- Door bottoms: Correct alignment first. Install a sweep or threshold that closes the full width without preventing safe operation.
- Utility penetrations: Use materials compatible with the pipe, cable, wall, and required clearances. When in doubt, call the appropriate trade.
- Vents: Replace damaged screens or guards with a design approved for that vent. Never reduce required airflow.
- Loose trim: Repair the underlying attachment or rot instead of covering the symptom with a bead of sealant.
Wear eye and hand protection appropriate to the work, and do not reach blindly into an opening. If animals may already be inside a wall or attic, sealing every exit at once can create a new problem. Active, extensive, or uncertain infestations are good reasons to involve a pest-management professional before closing routes.
Once a repair is complete, view it from both sides if possible. Tug lightly on guards or mesh, operate the door several times, and check that water still drains away. Photograph the finished area. A repair that survives a door cycle and a rainstorm is more useful than one that only looks neat for ten minutes.
If you want help sorting out sweeps, mesh, sealants, storage, or trap types, bring your measurements and photos when you visit us at Liberty Farm, Home & Garden in Galion. We can help you narrow the list without pretending every gap needs the same material.
Remove the Food, Water, and Shelter That Reward a Mouse
Exclusion works best when the space on both sides of the wall is less inviting. The EPA and CDC both emphasize removing food, water, and shelter. Around a farm-and-home property, that means looking beyond the kitchen. Pet food, livestock feed, grass seed, wildlife seed, garden produce, trash, compost, and residue beneath a scoop can all matter.
Start with the container, then the floor. Keep food and feed in intact, closed containers that resist gnawing, and follow any product-specific storage directions. Do not assume a thin tote is secure simply because the lid snaps. Inspect seams, corners, and lids for damage. Use older material first when appropriate, and label containers so an unmarked bin does not linger forgotten.
Clean spills promptly, including the dust and kernels that collect beneath pallets, shelving, feeders, and bag stacks. Rotate stock so you can inspect behind it. Keep bags off damp floors according to their storage needs, and leave enough space to see the wall. A tidy aisle is not only convenient; it lets you notice a new dropping, rub mark, or chew before it disappears under inventory.
Outside, use garbage containers with tight-fitting lids. The EPA recommends turning compost piles so newly added food scraps are covered. During an active infestation, it also recommends stopping outdoor bird feeding or using huskless feed that leaves less residue. That does not mean backyard birds caused the problem. It means spilled seed can keep feeding rodents while you are trying to remove them.
Reduce shelter without stripping the property bare. Move cardboard, unused fabric, and dense clutter out of protected corners. Keep leaf piles and deep mulch from building up against the foundation. Trim vegetation that touches walls or the roofline while preserving healthy landscape plants. Stack firewood in a managed location that allows inspection rather than tight against the house. Fix dripping faucets and other avoidable water sources.
Then establish a five-minute closing routine for the places that matter most:
- Sweep or collect spilled feed and seed.
- Close container lids and return scoops.
- Remove pet bowls or leftovers as appropriate for your routine.
- Close exterior doors fully and check the bottom corners.
- Look at the monitoring points you marked during inspection.
Small repeated habits make your repairs measurable. If food stays contained and new evidence still appears, you know to revisit entry routes and monitoring rather than simply cleaning the same spill again.
Trap Strategically When Evidence Is Active
If you find current signs indoors, trapping and exclusion should support each other. Sealing prevents more entry; trapping addresses rodents that may already be inside. The CDC recommends traditional snap traps for reducing rodent populations around the home and says to place them where signs have appeared or where rodents are likely to travel.
Read the trap instructions before setting it, and use the correct size for the animal involved. The CDC's placement guidance is specific: put a snap trap on the floor against the wall with the baited end next to the wall, forming a “T.” That position intercepts the wall edge rodents tend to follow. Useful locations may include behind appliances, at the back of cabinets, near attics or crawl spaces, and in low-traffic areas of outbuildings where evidence is present.
Keep every trap and bait out of reach of children, pets, poultry, and livestock. “Behind something” is not automatically inaccessible. Consider who can move the object, where a cat can reach, and whether a curious child visits the space. Use a protected placement or professional help when you cannot make the setup reliably inaccessible.
Check traps daily. The CDC advises continuing until rodents and fresh signs are gone; its current guidance uses one week with no captures and no new signs as a practical checkpoint. Keep inspecting the repaired openings during that period. A trap result tells you where activity occurred, not necessarily where the animal entered.
The CDC advises against glue traps and live traps because frightened rodents may urinate, potentially increasing exposure risk. It recommends considering poison or bait stations only for infestations that persist. If you reach that point, use only an EPA-registered product for the site and pest, follow the label exactly, and consider a licensed professional—especially in a home with children, pets, livestock, or complex access.
Avoid the temptation to keep adding traps without reviewing the map. If nothing is caught but droppings continue, reconsider placement, species identification, inaccessible food, and openings you may have missed. If captures continue after repairs, the population or building complexity may be beyond a do-it-yourself job.
Clean Droppings and Nests Without Raising Dust
Cleanup is not ordinary sweeping. Rodent urine, droppings, saliva, and nesting material can expose people to disease. The CDC's central warning is simple: do not vacuum or sweep dry droppings or nesting material. Those actions can put contaminated particles into the air.
For a home or outbuilding such as a shed or barn, the CDC says to open doors and windows for 30 minutes before cleaning and leave the area during ventilation. Return wearing rubber or plastic gloves. Use a general-purpose household product whose label says “disinfectant,” or the CDC's specified fresh bleach solution when suitable for the surface. Never mix bleach with ammonia or any other cleaner, and follow label directions for ventilation, contact time, surface compatibility, and protective equipment.
For urine and droppings, spray until very wet and let the disinfectant soak for five minutes or for the time stated on the product label. Wipe up with paper towels, place the waste in a covered garbage container that is emptied regularly, then disinfect the hard surface. Wash gloved hands before removing the gloves, then wash bare hands with soap and warm water.
Dead rodents and nests require similarly careful handling. Wet the rodent, nest, and surrounding area with disinfectant and allow the required contact time. The CDC directs people to place the material and used trap in a plastic bag, knot it closed, place that bag inside a second bag, seal it, and dispose of it in a covered garbage container. Follow local requirements if they differ.
Heavy infestations, contaminated HVAC systems, widespread insulation contamination, and enclosed spaces may require additional respiratory protection and professional procedures. Do not improvise in those settings. The CDC specifically recommends professional help when rodents have accessed heating and cooling ventilation systems. Seek medical advice if you become ill after rodent exposure, and tell the healthcare provider about that exposure.
Safe cleaning serves two purposes: it reduces exposure and resets the area for monitoring. Once the surface is clean, a new dropping or fresh gnaw mark means more than a pile that may have been present for months.
Use a Seven-Day Plan—and Know When to Call
You can turn this guide into one manageable week instead of trying to solve the whole property in an afternoon.
- Day 1: Map signs. Photograph droppings, damage, suspected routes, food sources, and building gaps. Do not disturb contaminated material dry.
- Day 2: Clean safely. Follow CDC ventilation, wet-disinfection, disposal, glove, and handwashing guidance. Mark the cleaned areas for reinspection.
- Day 3: Remove rewards. Clean spills, secure food and feed, manage trash and compost, correct water sources, and create inspection space.
- Day 4: Repair priority openings. Start with gaps that align with active signs. Match the material to the surface and preserve required drainage and ventilation.
- Day 5: Place monitoring and traps. Where evidence is active, follow the trap instructions and CDC placement guidance. Protect children and animals.
- Days 6 and 7: Recheck. Inspect repaired areas, containers, cleaned surfaces, and traps. Record what changed rather than relying on memory.
Continue daily trap checks and regular inspections beyond the first week when activity was present. A week is a checkpoint, not a guarantee. The building may have multiple routes, and a door sweep that looks good while closed may open a corner after several cycles.
Bring in a professional when the risk or complexity rises
Call a qualified pest-management professional for persistent activity, a heavy infestation, rodents in HVAC ducts, uncertainty about the species, inaccessible wall or attic areas, or conditions you cannot make safe for children and animals. Call an electrician or equipment professional when wiring or controls are damaged. Structural cracks, roof repairs, gas penetrations, and combustion or ventilation concerns belong with the appropriate trade.
When hiring pest control, ask how the company will identify entry points, protect people and animals, document pesticide use, and verify that activity has stopped. A plan built only around recurring bait placement may leave the building defects and food sources unchanged.
The useful outcome is not merely “we caught a mouse.” It is a building you can inspect, food you can protect, evidence you can interpret, and repairs you can maintain. If you need to compare supplies after measuring the openings, you are welcome to bring the list to Liberty Farm, Home & Garden. We serve Galion and the surrounding north-central Ohio area, and we can help you organize the project without turning it into a guess-and-buy exercise.
Put a reminder on the calendar for another exterior walk after leaves fall and again before winter storage settles in. Recheck door seals, utility penetrations, feed areas, and any repair exposed to weather. Prevention is not a one-time sealant job; it is a short inspection habit tied to the way your property changes through the season.
Frequently Asked Questions
Keep Reading
Fall Webworms in Ohio: What to Do About Those Late-Summer Tree Nests
Identify fall webworm nests in Ohio trees, distinguish them from tent caterpillars, assess damage, and choose safe late-summer management.

Yellowjackets in Ohio: A Practical Late-Summer Guide to Picnics, Nests, and Stings
Handle Ohio's late-summer yellowjackets safely with practical tips for outdoor meals, nest awareness, sting response, traps, and professional removal.